pixmoat / field notes / Implementation
Hosted visual regression testing with Playwright: a complete setup
Playwright can prove that a page still behaves correctly while missing the regression your users actually see: a button wrapping onto two lines, a navigation item pushed below the fold, or a mobile layout losing its spacing. Functional assertions answer “does this interaction work?” A screenshot comparison answers a different question: “did the rendered interface change?”
Adding toHaveScreenshot() is the easy part. A reliable hosted visual regression setup also needs stable capture conditions, identifiable baselines, a review workflow, and a CI policy that tells the team what to do with a changed image. Without those pieces, screenshot testing becomes a noisy collection of artifacts that someone has to maintain.
This guide adds that loop to an existing Playwright suite, starting with one screenshot and one browser before expanding coverage.
Why hosted visual regression is harder than screenshot capture
The pixels are only as trustworthy as the conditions that produced them. A page can differ between two runs because of a timestamp, an avatar, random data, an animation caught mid-frame, a font that has not loaded, or a different viewport and device pixel ratio. A diffing service cannot tell whether those changes are meaningful unless the test establishes a repeatable page state first.
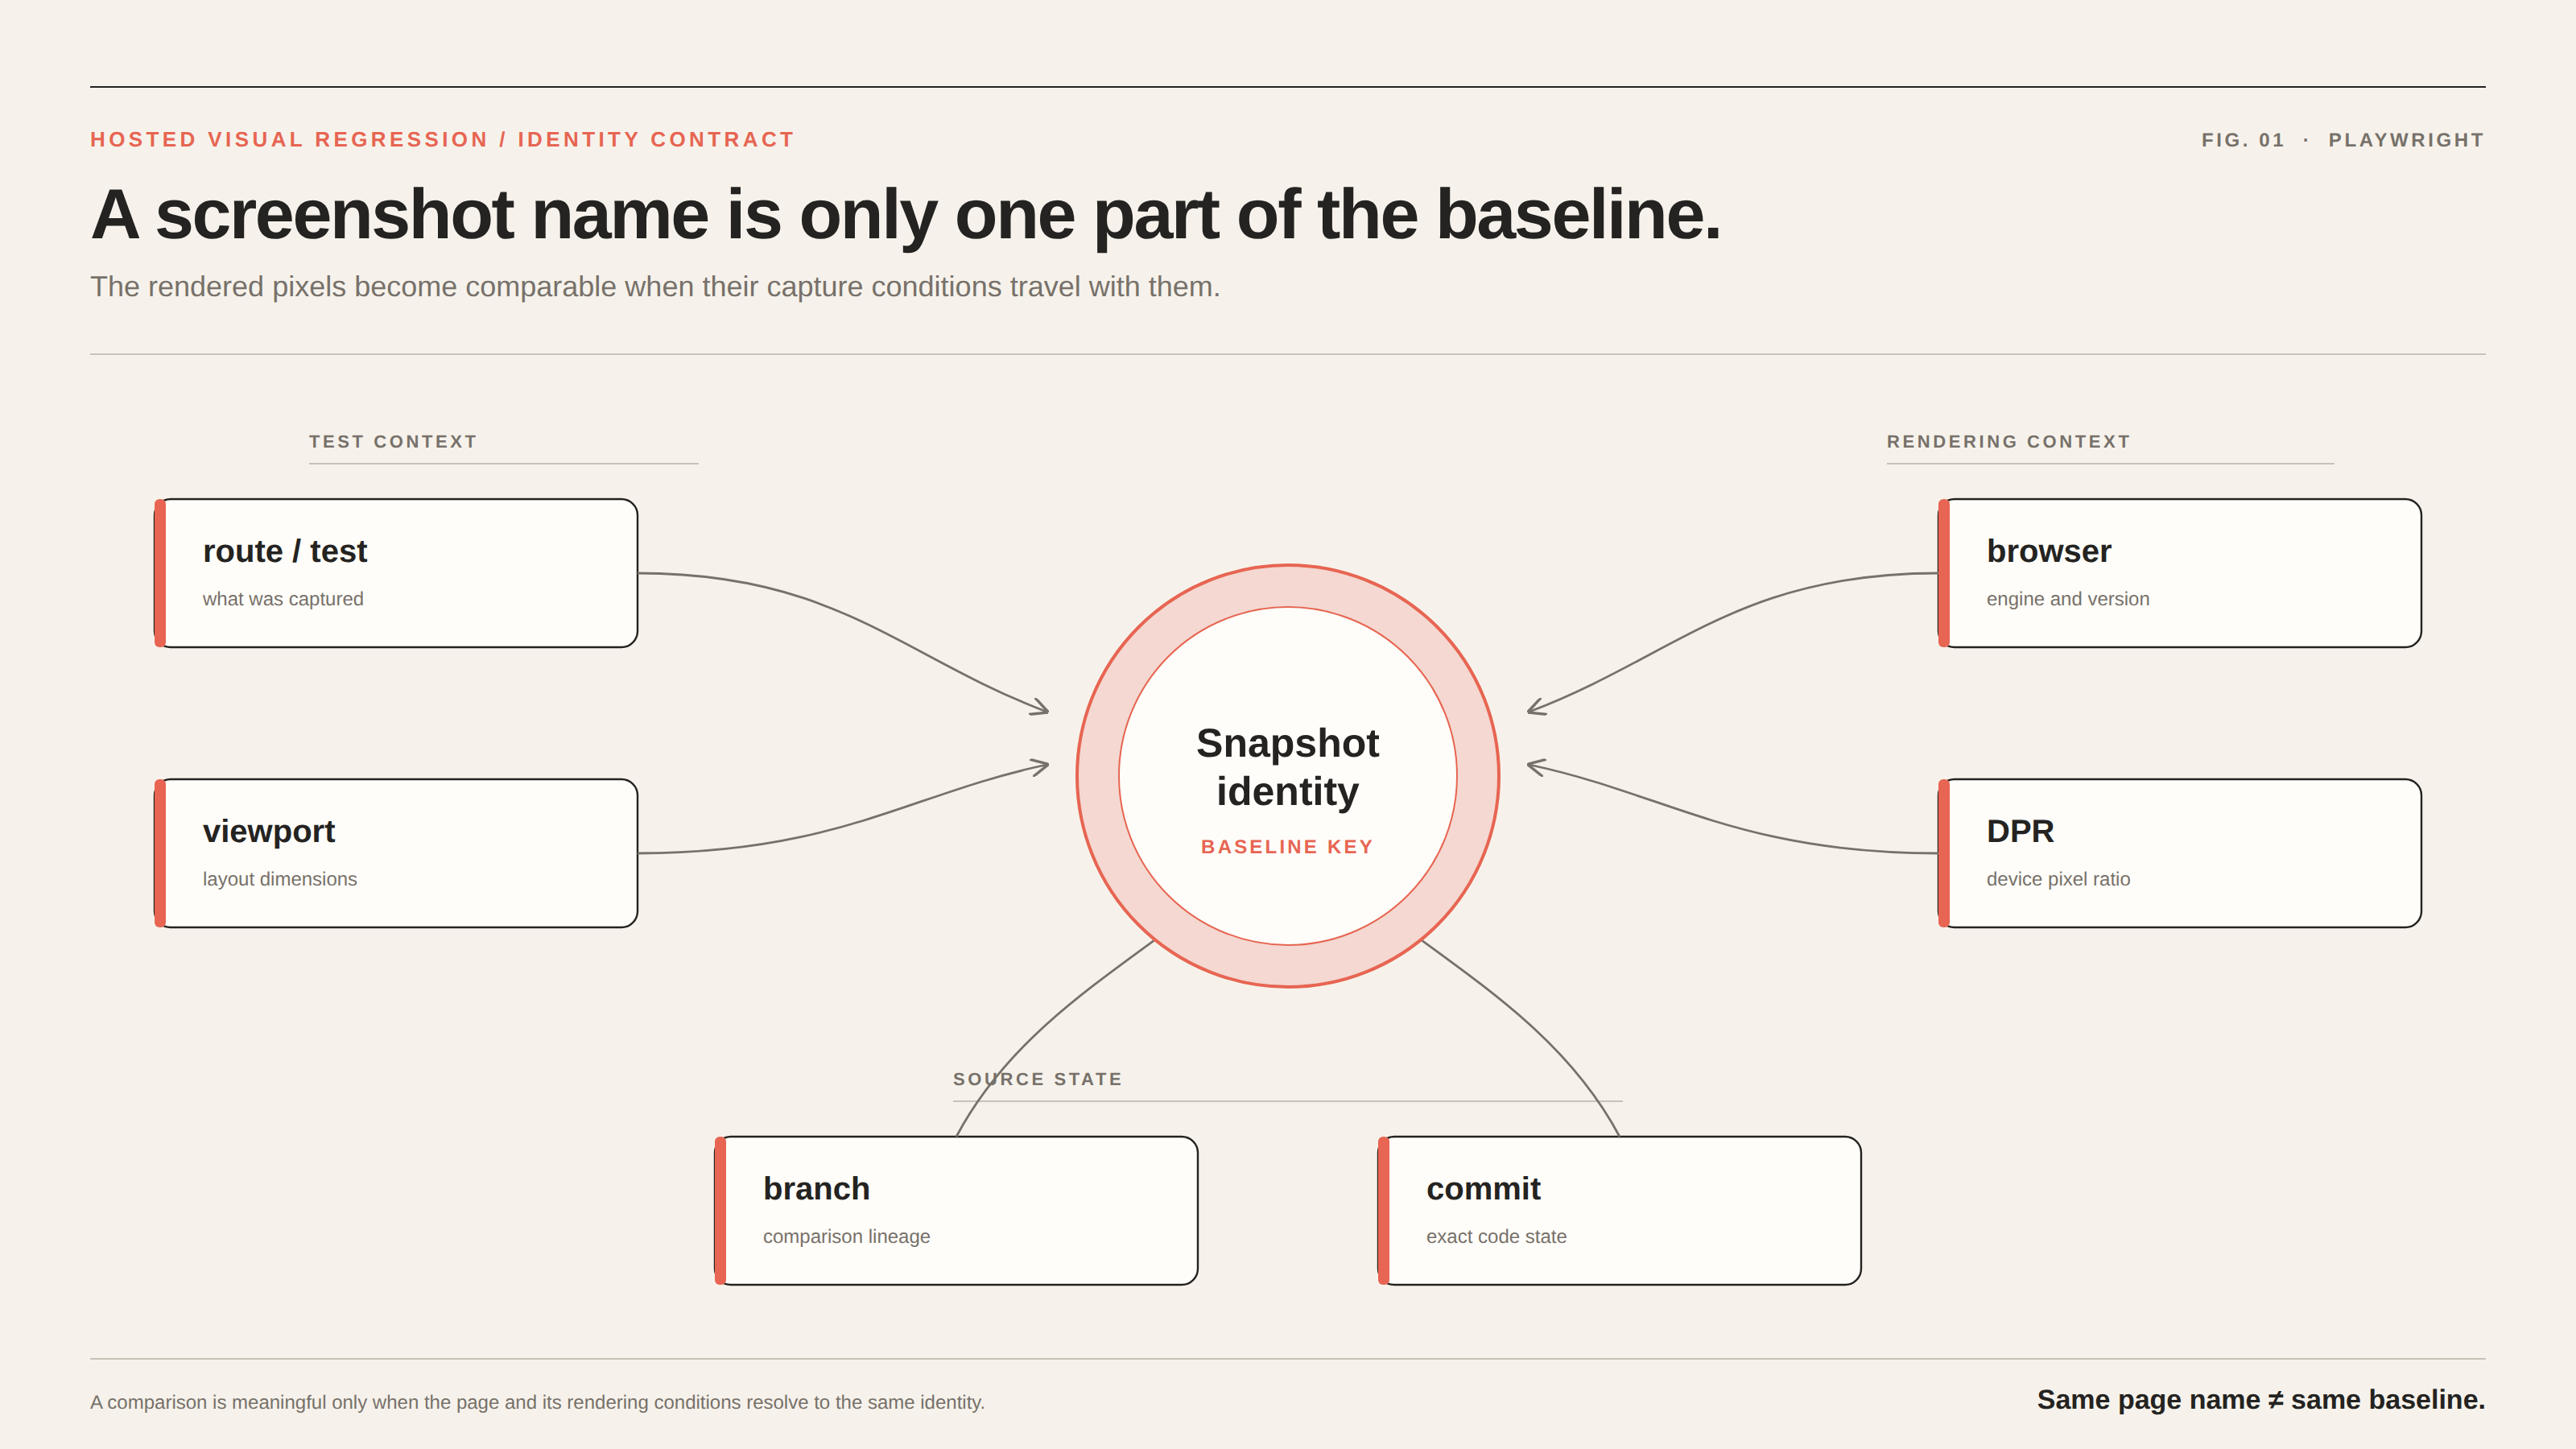
There is also an identity problem. checkout is not a complete snapshot key when the same page is captured at 1280x720 and 375x812, or in Chromium and WebKit. Viewport, browser, DPR, branch, and commit are part of the comparison contract. If they are implicit or inconsistent, the review history becomes difficult to interpret.
Finally, a changed screenshot is not automatically a failure of the product. It may represent an intended redesign, an accidental CSS regression, or capture noise. The workflow needs a deliberate decision: inspect the change, fix it or approve it, and then send the resulting state back to CI. Baselines should change because a reviewer made a decision, not because a job happened to upload a new file.
Stabilize the Playwright capture first
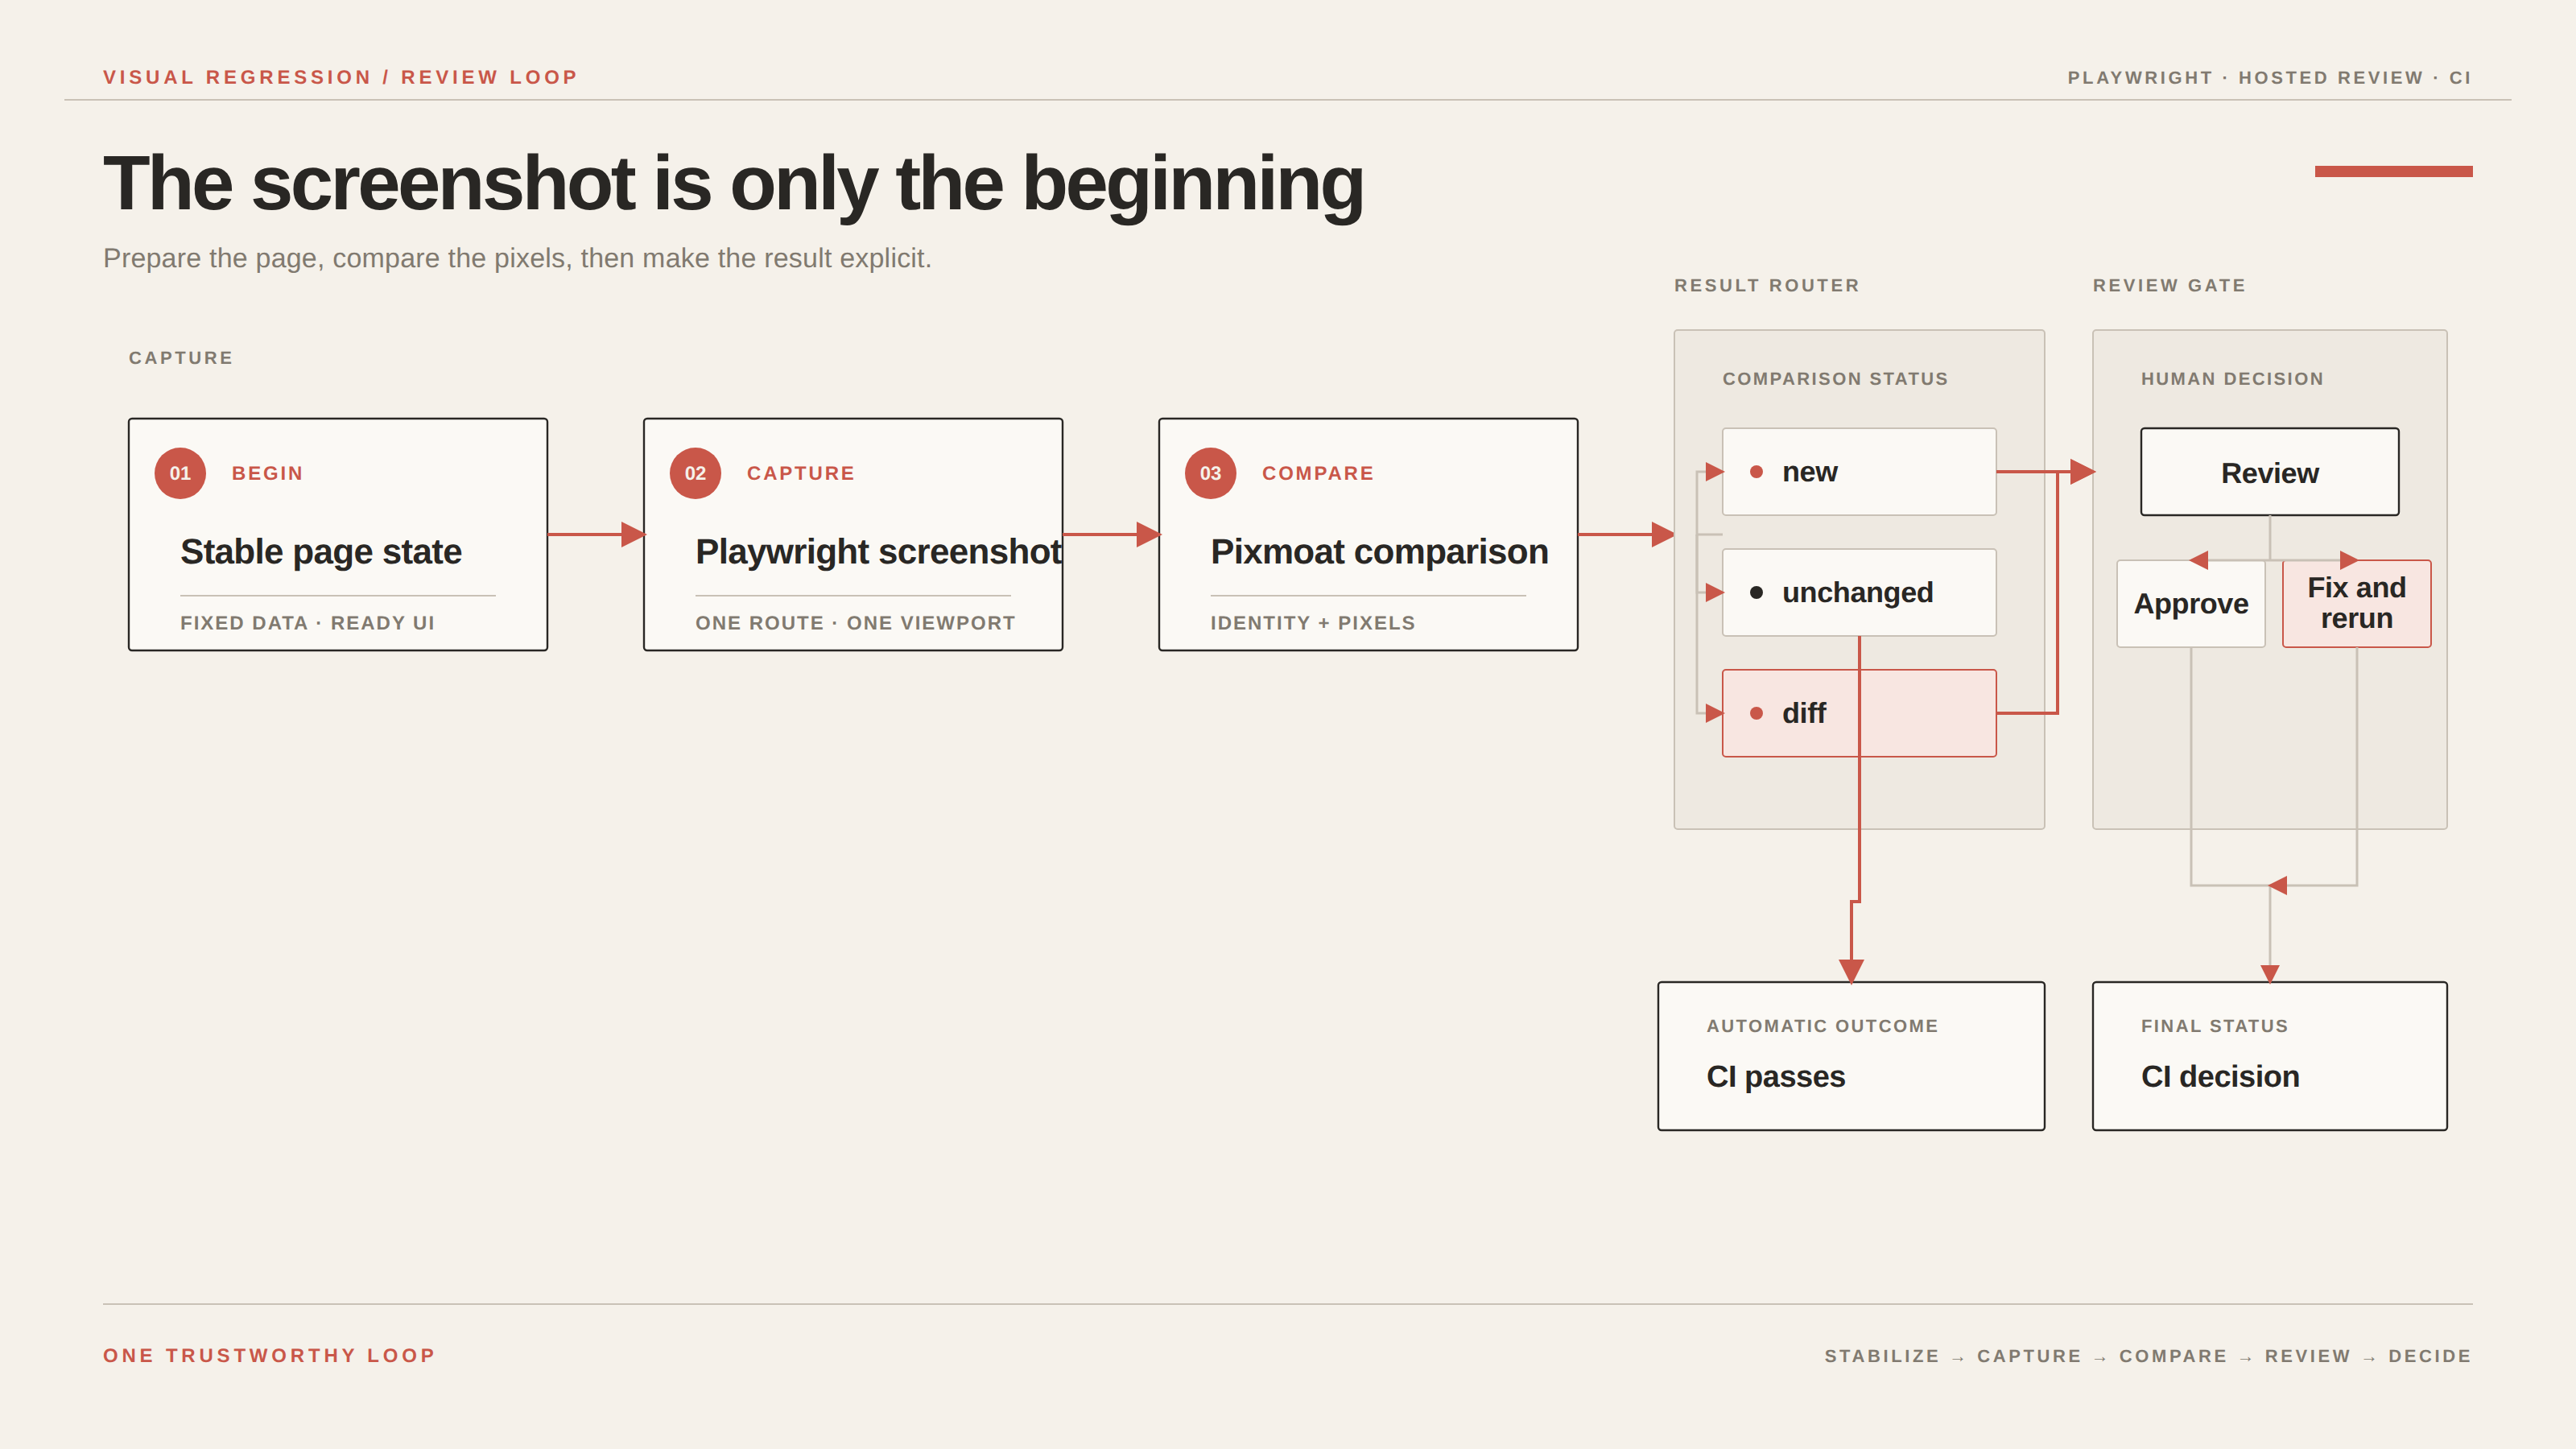
Before choosing tolerances or adding dozens of snapshots, make one page deterministic.
Use fixed test data and explicit readiness checks. Wait for the meaningful UI state rather than an arbitrary timeout. Disable transitions and animations where they are not part of the behavior under test. Ensure the same fonts and assets are available in local and CI environments. If a timestamp, relative-time label, avatar, or advertisement is not the subject of the test, mask it with a locator or coordinate region.
Treat tolerance as a narrowly scoped tool, not a substitute for stability. A larger global tolerance may hide a real one-pixel layout shift across a large surface. If a particular screenshot has known rendering variation, use its per-screenshot tolerance and verify the result against a deliberately introduced defect.
Start with a high-value route and one viewport. A checkout form, authenticated dashboard, or navigation shell usually gives more useful feedback than a randomly selected page. Once the first baseline is easy to understand, add a mobile viewport, full-page capture, or another browser based on an actual compatibility risk. Every additional viewport multiplies capture and review work, so coverage should follow risk rather than completeness for its own sake.
A reproducible hosted setup for an existing suite
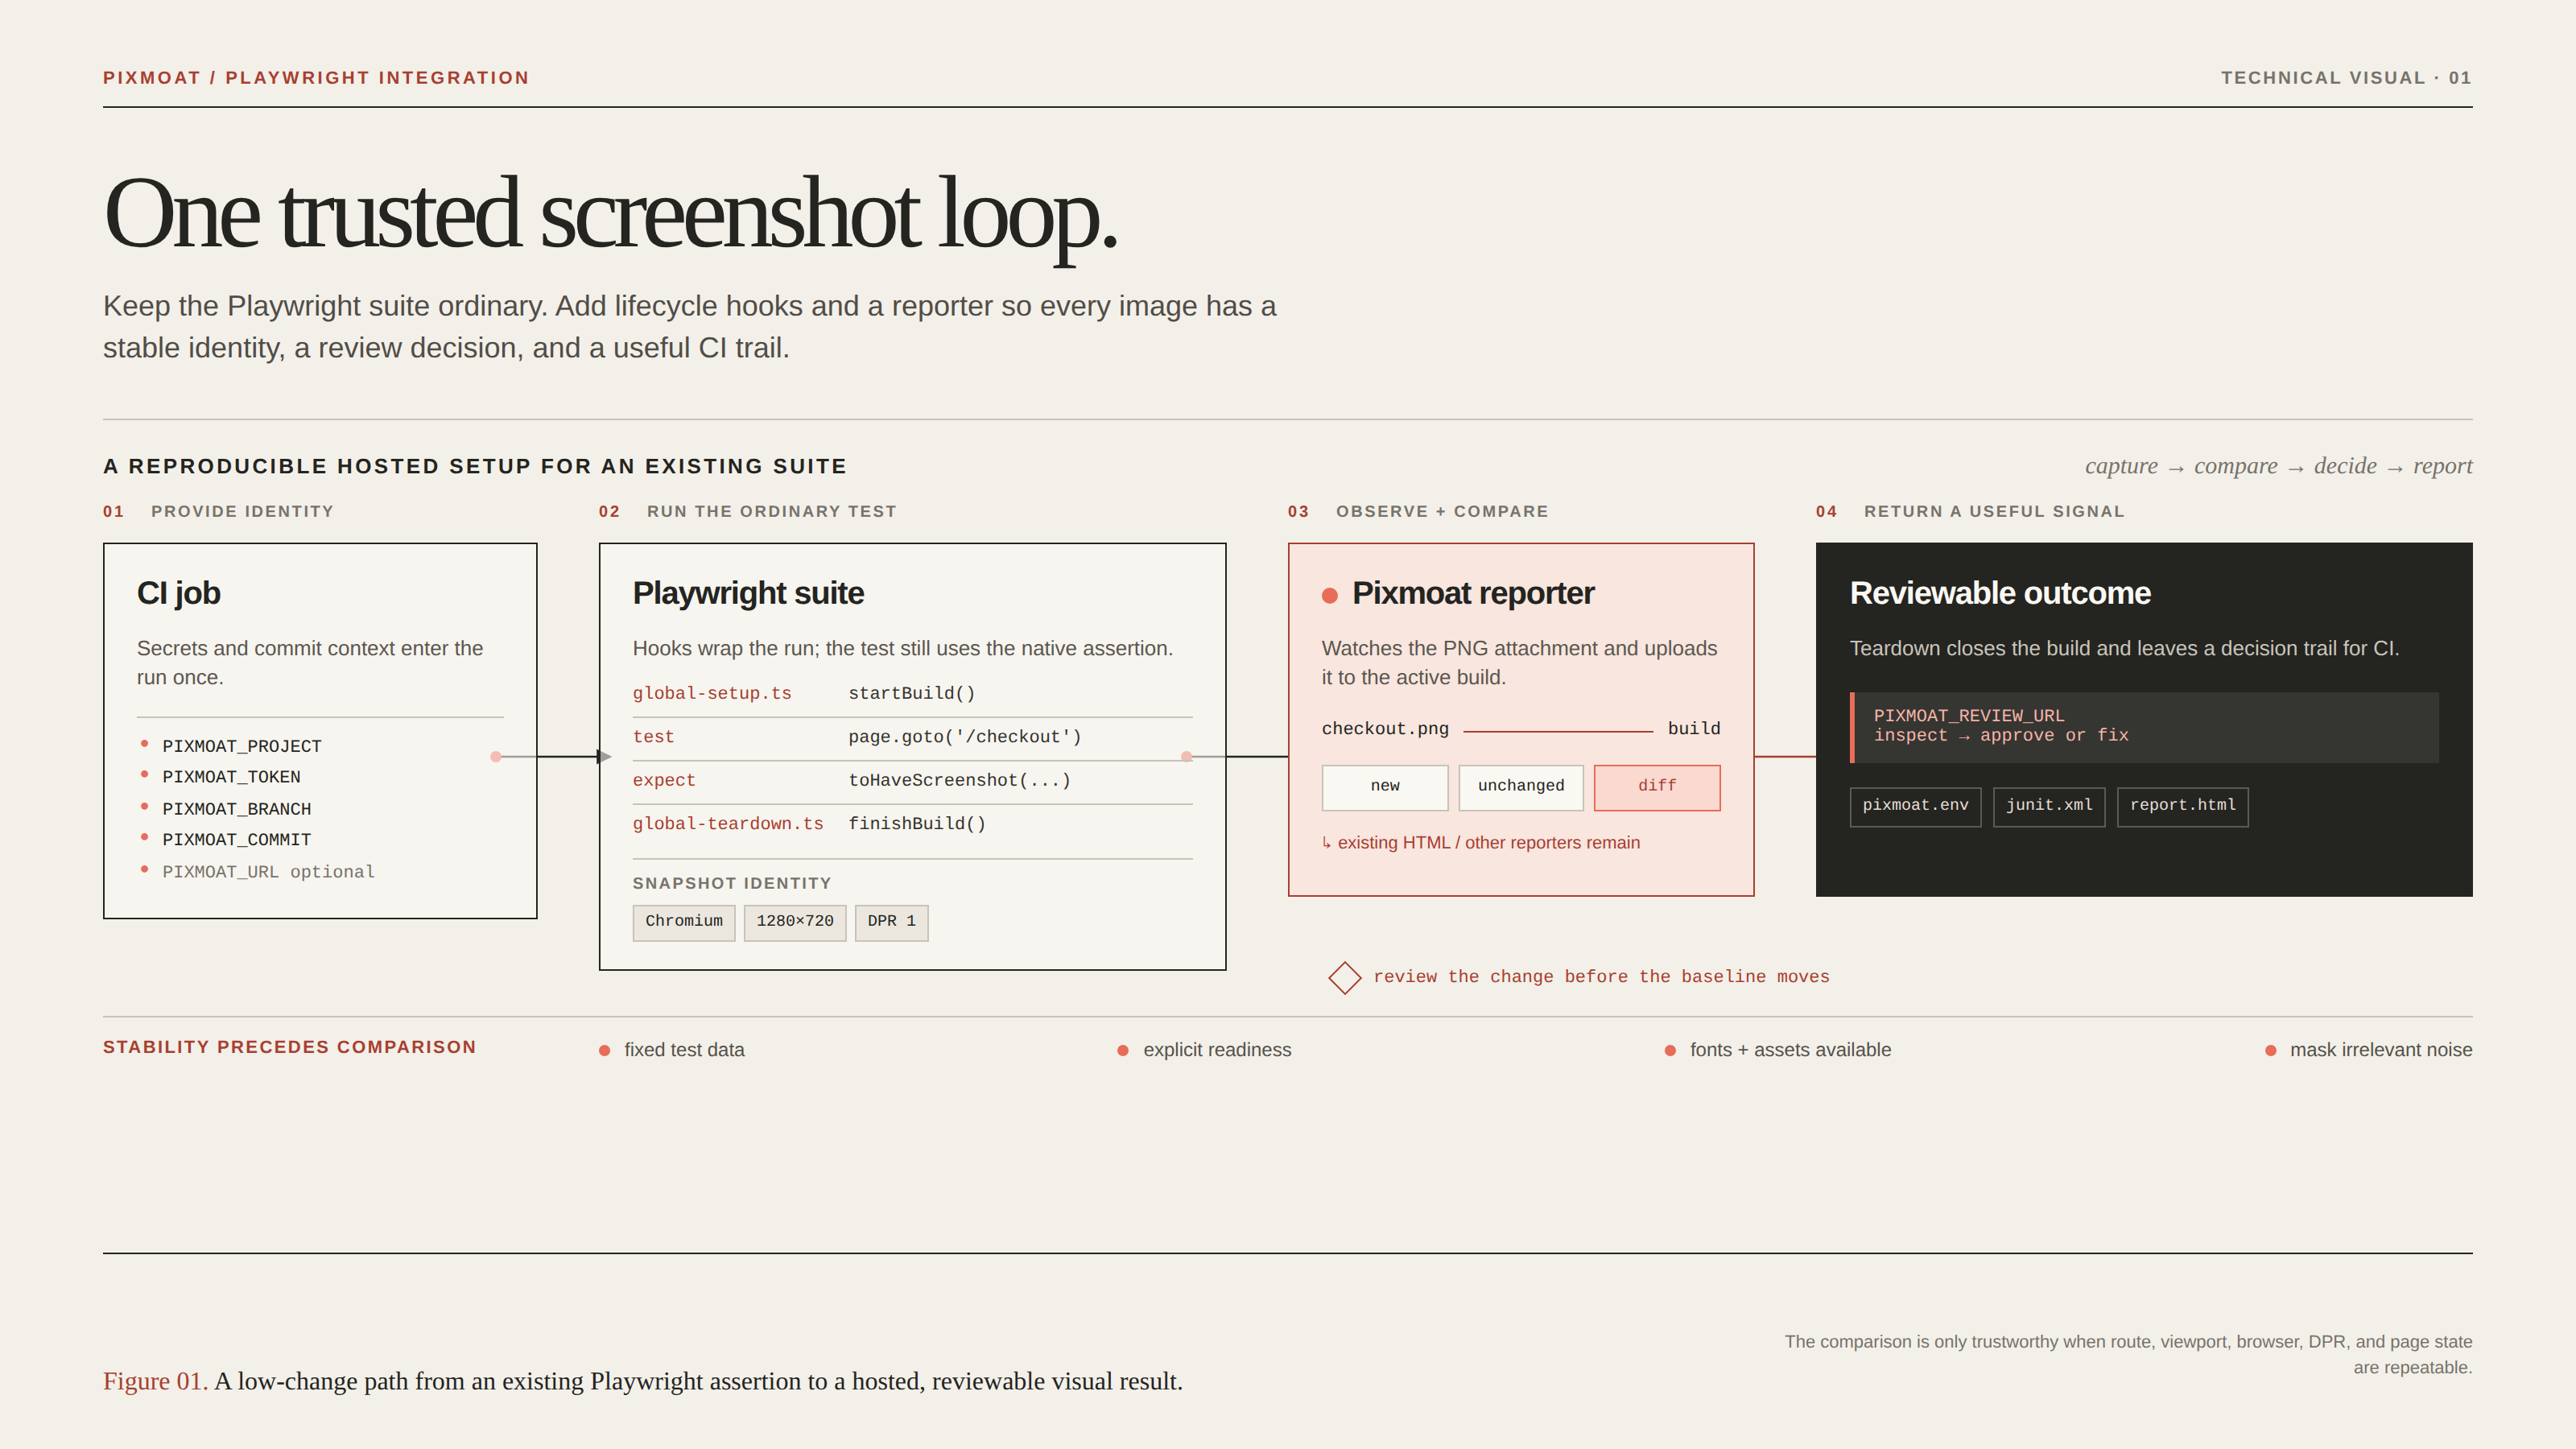
The lowest-change path is the reporter integration. It works with existing Playwright tests that already use expect(page).toHaveScreenshot() and does not require replacing the test runner’s test import.
First install @s4labs/pixmoat-playwright with npm install @s4labs/pixmoat-playwright. The documented client requires Node.js 18+ and Playwright 1.30+. Create a Pixmoat project and keep its project access token in your CI secret store.
Set these variables in the environment that runs the tests: PIXMOAT_PROJECT for the project slug, PIXMOAT_TOKEN for the project token, PIXMOAT_BRANCH for the branch name, and PIXMOAT_COMMIT for the commit SHA. PIXMOAT_URL defaults to https://app.pixmoat.com; set it explicitly when using another Pixmoat deployment.
Next add build lifecycle hooks. In global-setup.ts, import startBuild from @s4labs/pixmoat-playwright and export an async setup function that calls await startBuild(). In global-teardown.ts, import finishBuild and export an async teardown function that calls await finishBuild(). Point globalSetup and globalTeardown in playwright.config.ts at those files. The build identifier is shared across Playwright workers, and teardown marks the build complete with its snapshot summary.
Keep the test itself ordinary:
import { test, expect } from "@playwright/test";

test("checkout form", async ({ page }) => {
  await page.goto("/checkout");
  await expect(page).toHaveScreenshot("checkout.png");
});
Add @s4labs/pixmoat-playwright/reporter to the existing reporter array in playwright.config.ts. The reporter watches the PNG attachment generated by toHaveScreenshot(), uploads it to the build, prints the review URL, and writes pixmoat-report/pixmoat.env, pixmoat-report/junit.xml, and pixmoat-report/report.html. Keep your existing HTML or other reporters alongside it.
Run the test locally with the four required variables set. On the first run, the result should be new because no baseline exists. Review and approve that image as the starting point. Run the same test again without changing the page: it should be unchanged. Make a controlled CSS change, such as changing the checkout button’s padding, and run it again: the candidate should be reported as diff and become available for review. Restore the CSS or approve the intentional change, then repeat the run to confirm that the final state matches your decision.
Choosing between the reporter and fixture API
The reporter is a good first step when a suite already has visual assertions. It leaves test code unchanged and derives snapshot names from the test title path and screenshot attachment. It is particularly useful when the team wants to add a hosted review surface without rewriting a mature suite.
Use the fixture API when new tests need explicit control. Import test from @s4labs/pixmoat-playwright and call pixmoat.snapshot(page, "dashboard", options). The documented options include fullPage, viewport or viewports, browser or browsers, dpr, mask, performance, and a per-snapshot tolerance. The call returns a result such as new, unchanged, or diff, together with the mismatch ratio and run ID.
The fixture approach is useful for responsive coverage: capture responsive-layout at 1920x1080, 1280x720, 768x1024, and 375x812 in one call, then inspect each viewport separately. It also collects Core Web Vitals and resource metrics.
Make CI useful to reviewers and operators
Treat the token as a machine credential. Store PIXMOAT_TOKEN as a masked CI/CD variable, and pass branch and commit identity from the CI provider so local and pipeline builds use the same naming rules. Retain visual reports when the job fails; the failure is often the moment a reviewer most needs the review URL and artifact summary.
For GitLab, the reporter’s dotenv file can expose PIXMOAT_REVIEW_URL, the JUnit file can populate the merge-request test summary, and the HTML report can be exposed as a downloadable artifact. The GitLab merge-request integration guide documents the complete job configuration, including report-only adoption and hard merge-blocking modes.
Do not make the visual job blocking on day one. Establish a few baselines, introduce one known style change, and confirm that the reviewer can open and decide the diff. Then introduce a known unstable element and verify that the fix is a readiness change or mask rather than a blanket tolerance increase. Once the team understands the signal, use a hard-failing pixmoat check --wait job when visual review should block a merge. Use path-based CI rules to skip capture for backend-only changes that cannot affect the rendered UI.
Branch behavior deserves the same care. A feature branch should compare against the intended default-branch baseline or its approved branch history. If several branches change the same surface, make the review decision explicit and investigate conflicts instead of silently overwriting a newer visual state.
Use Codex to shorten the loop, not skip the decision
AI coding agents are useful when they can make a UI change and immediately check the rendered result. In this project, Codex helped wire the Astro article page, verify the image assets and links, run the Playwright client checks, and keep the publication workflow honest about what was ready and what still needed a human decision.
The same pattern works in a product repository:
- Ask Codex to make one focused UI change.
- Run the Playwright suite with the Pixmoat reporter.
- Ask the agent to inspect the build summary and changed regions.
- Fix an unintended regression or approve an intentional design change yourself.
Let the agent accelerate the edit-and-check loop. Keep the baseline approval explicit.
Pixmoat exposes an agent-facing workflow, while the Playwright integration guide covers the reporter and fixture setup. The tool can make the evidence easier to read; it should not turn an unreviewed screenshot into a new source of truth.
Where Pixmoat fits
Pixmoat is a hosted, Playwright-first visual regression workflow and is Playwright-only in v1. Its comparison is deterministic pixel comparison with configurable tolerance, anti-aliasing detection, and dimension-mismatch handling. It provides branch-aware baselines, viewport and browser identity, diff images, and a review session for new and changed snapshots.
It is most useful after the Playwright capture itself is stable. Pixmoat does not choose whether a redesign is good, repair nondeterministic application data, or replace functional assertions. You still own route setup, test data, readiness, and the approval decision. If your team needs a different test runner or a Storybook-specific workflow, validate that fit before adopting a Playwright-only integration.
For the hosted workflow, use the Using pixmoat guide to understand the product loop, then the Playwright integration guide for package installation, environment variables, reporter configuration, and fixture usage.
Start with one trustworthy loop
Hosted visual regression testing succeeds when it preserves the Playwright tests you already trust and makes the surrounding decisions visible. Begin with one deterministic route, one stable snapshot identity, and one clear CI result. Prove the loop with a known unchanged run and a known changed run. Then expand coverage according to the UI risks your team actually needs to catch.
When you are ready to run the example, start a free Pixmoat project and connect it through the Playwright integration guide.