pixmoat / field notes / Problem-aware
Masking Dynamic Content in Playwright Screenshots
A dynamic value can make a good screenshot test look broken
Your Playwright screenshot test is checking a profile card, dashboard, or checkout flow. The layout has not changed, but the build is red because a timestamp says “3 minutes ago” in one run and “4 minutes ago” in the next. Perhaps an avatar is selected at random, an ad slot returns different content, or a number is updated by an API between capture and comparison.
The obvious response is to mask the whole component. That makes the failure disappear—but it also means a changed button, broken card spacing, or missing image can disappear with it. A visual test is useful only when it removes noise without removing the evidence you asked it to collect.
The reliable approach is to separate three jobs: make the page deterministic where you can, mask only values that are outside the test’s purpose, and verify that the remaining pixels still catch an intentional UI change.
Why masking is harder than it looks
Screenshot comparison sees pixels, not intent. It cannot know that a changing date is harmless while a one-pixel shift in the date’s container signals a layout regression. It also cannot tell whether a blank region is an intentionally hidden avatar or an image that failed to load.
There are two different kinds of instability to diagnose:
| What changes | Better first response | What should remain visible |
|---|---|---|
| The same data varies between runs | Seed or mock the data | The component’s structure, spacing, and controls |
| A timestamp, rotating avatar, or ad is intentionally not under test | Mask the smallest region | The surrounding layout and all in-scope elements |
| Fonts, images, transitions, or late content settle at different times | Wait for readiness or disable irrelevant motion | The final rendered state |
| A whole card moves or wraps differently | Fix the page state or test environment | The movement itself—it may be the regression |
This is why a larger tolerance is rarely the first fix. Tolerance can absorb rendering variation, but it can also accept a real visual change. Likewise, retries can show that a capture is unstable, but they do not make the underlying page state stable.
A practical masking workflow
1. Define what the screenshot is meant to prove
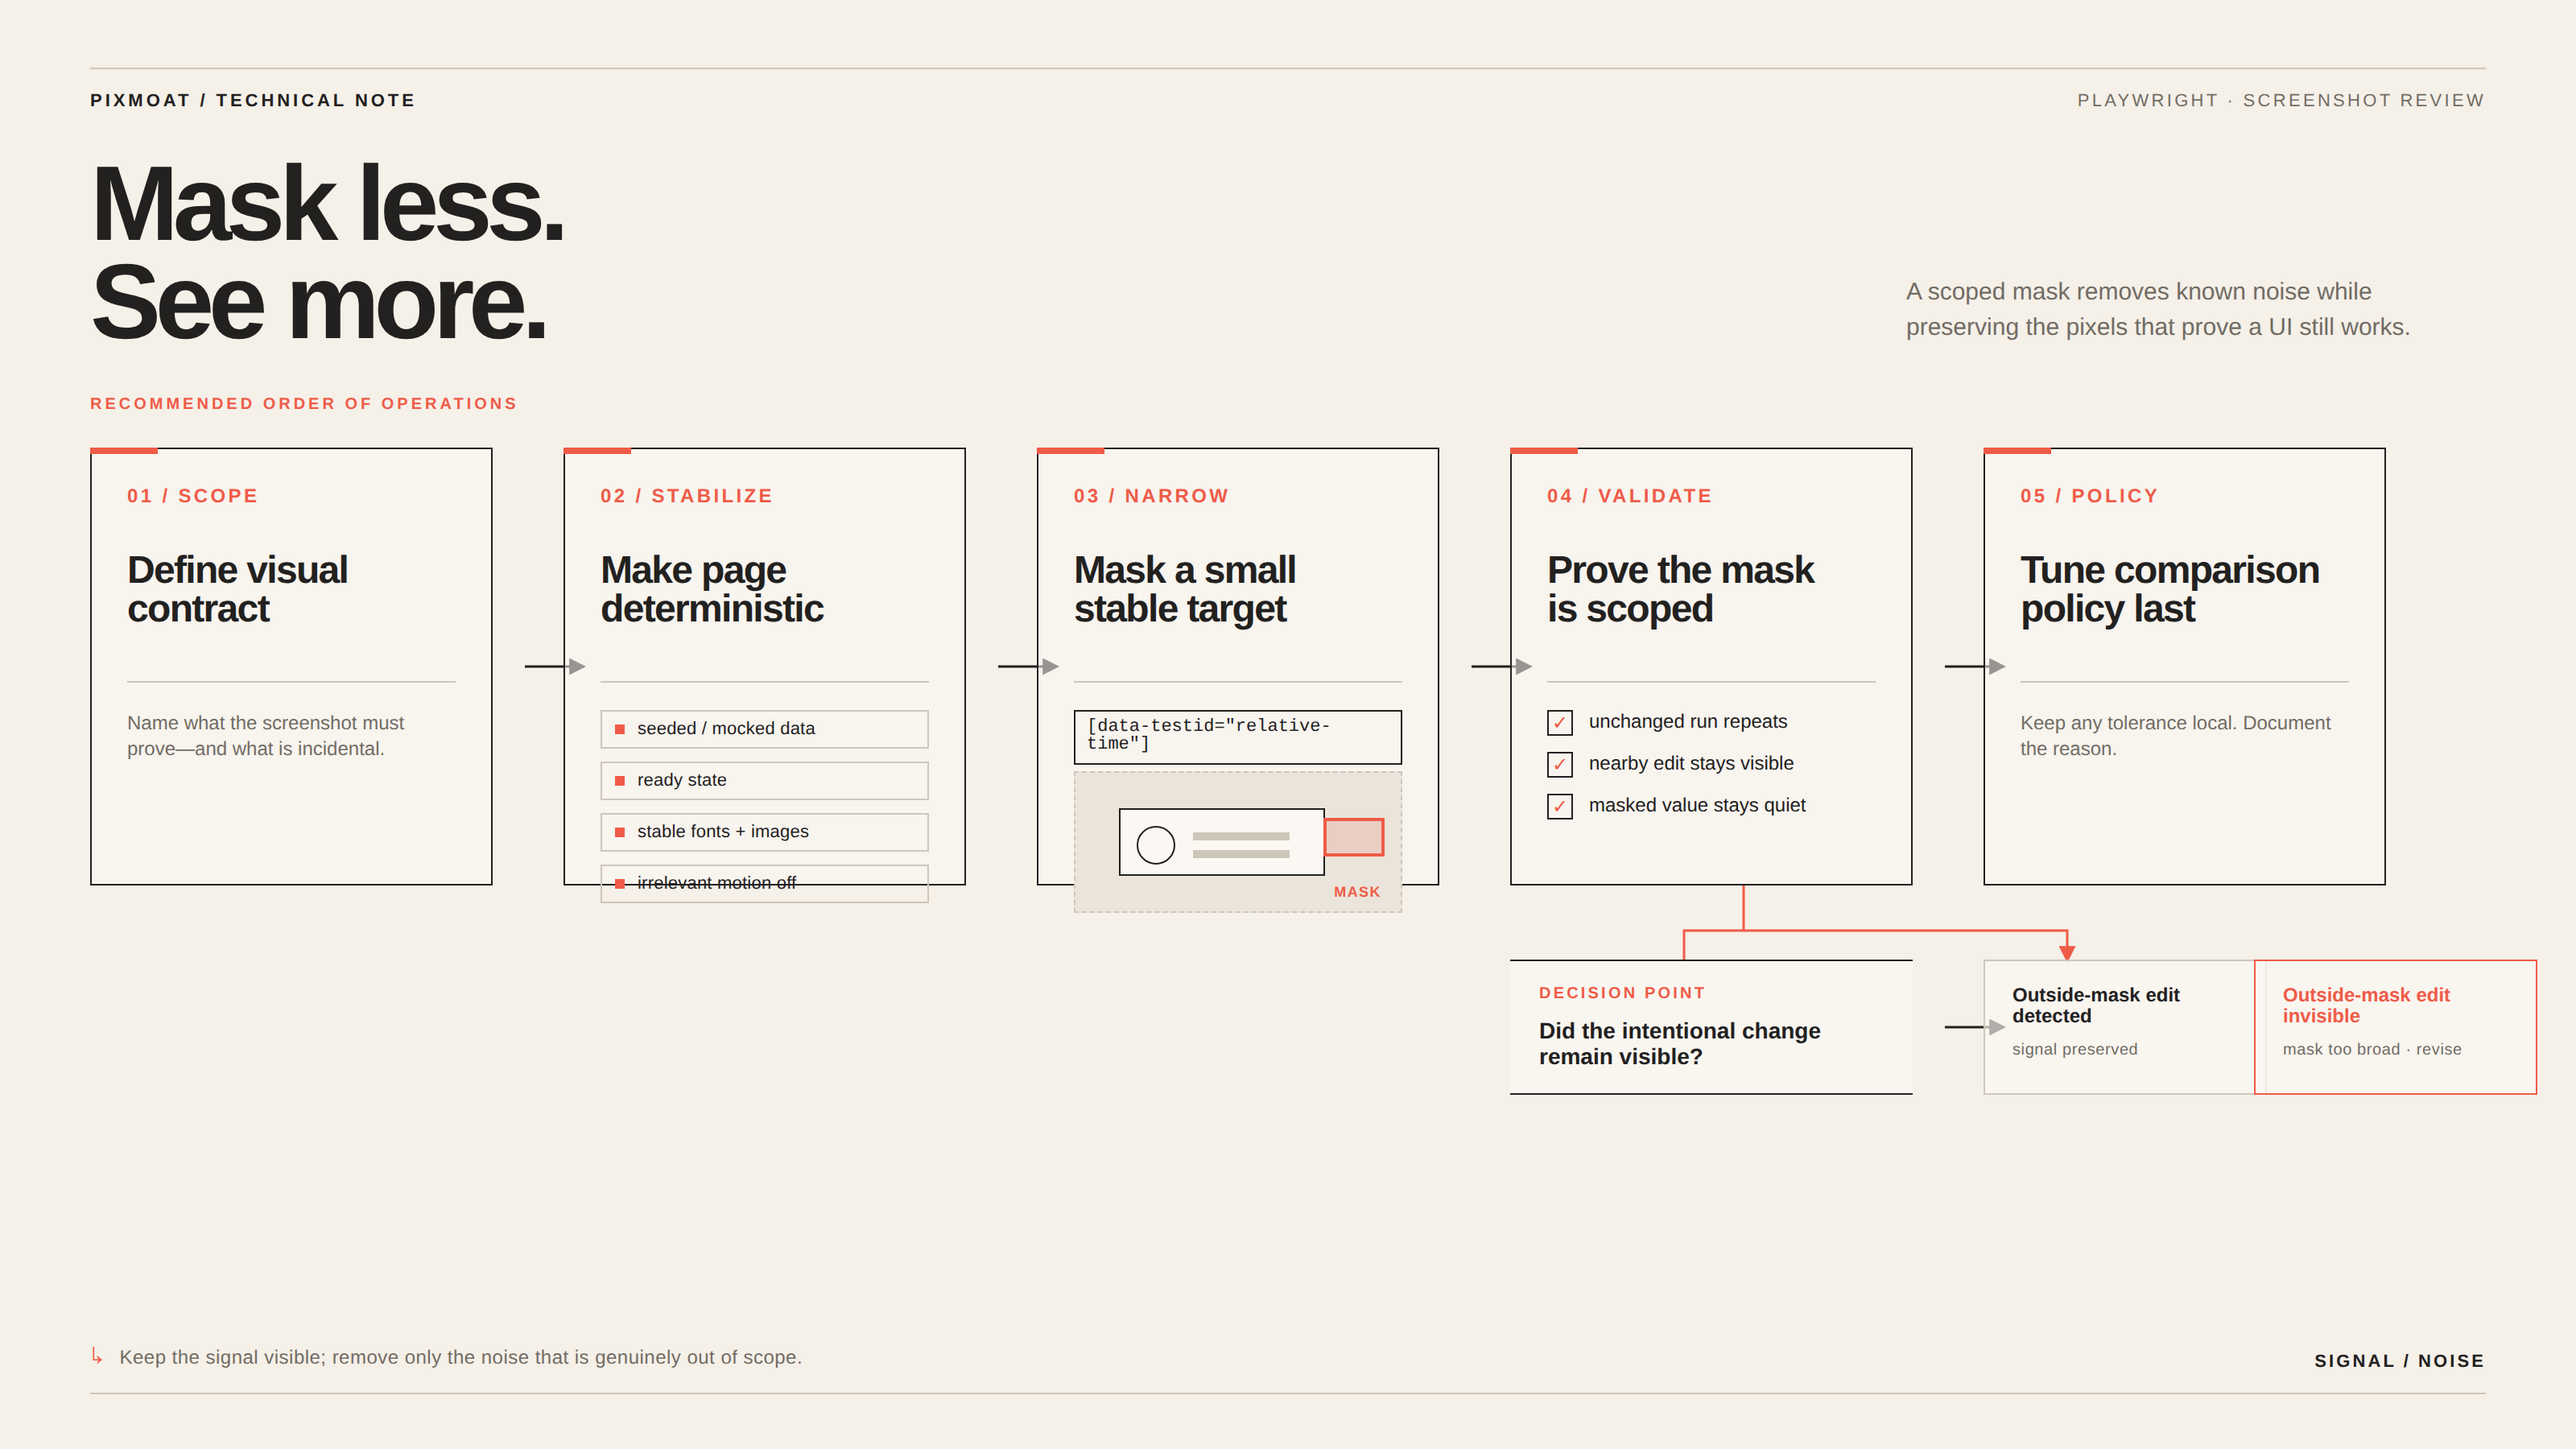
Write the test’s visual contract in plain language before adding a mask. For a profile card, the contract might include the card’s width, padding, avatar shape, name typography, and action buttons. The relative-time label may be incidental. An advertisement may be outside the product surface entirely.
This distinction gives you a boundary: mask the relative-time text, not the card; mask an ad slot, not the page section containing it.
2. Make the page deterministic first
Use one route, one browser, and one viewport while debugging. Seed fixtures or mock the API response for data that should be stable. Wait for a user-visible readiness condition—such as the profile card being present—instead of relying on a fixed sleep.
Rendering readiness matters too. Fonts that swap after the screenshot, images that are still decoding, and CSS transitions caught mid-flight can create differences that look like application changes. Pin the browser and Playwright versions used by CI, keep the viewport and device pixel ratio explicit, and disable motion that is not part of the test. If the animation itself is the subject of the test, capture a deliberate state instead.
3. Mask a small, stable target
Prefer a locator with a stable test identifier over a broad CSS ancestor or coordinate rectangle. A good mask has a narrow purpose and remains understandable six months later. Name it after the reason it exists—for example, relative-time or rotating-ad—rather than masking a generic div.
Check the mask at every viewport you capture. Element positions can change in responsive layouts, so a mask that is correct on desktop may cover the wrong pixels on mobile if its bounds are not resolved for that viewport.
4. Prove that the mask is not too broad
Use a three-run diagnostic:
- Capture a new baseline for the unchanged page.
- Run the same commit again and confirm the result is unchanged.
- Make one deliberate edit outside the mask—for example, increase the action button’s padding—and confirm that the diff appears in the button region.
Then make a second deliberate edit inside the masked region. The expected result is that the dynamic value does not create a diff. If changing the button is invisible, your mask is too large. If changing only the timestamp still produces noise, the selector or readiness strategy needs attention.
5. Tune comparison policy last
Only after the page is deterministic and the mask is scoped should you adjust a per-screenshot tolerance or anti-aliasing setting. Keep the change local and document why it exists. A project-wide tolerance is a policy decision; it should not be a substitute for fixing a late API response or a missing font.
For intermittent variation that remains after these steps, run the unchanged capture multiple times and compare the captures with one another. That tells you whether you have a product diff or an unstable observation. The related guide on dealing with flaky Playwright screenshots covers that diagnostic in more detail.
A reproducible profile-card example
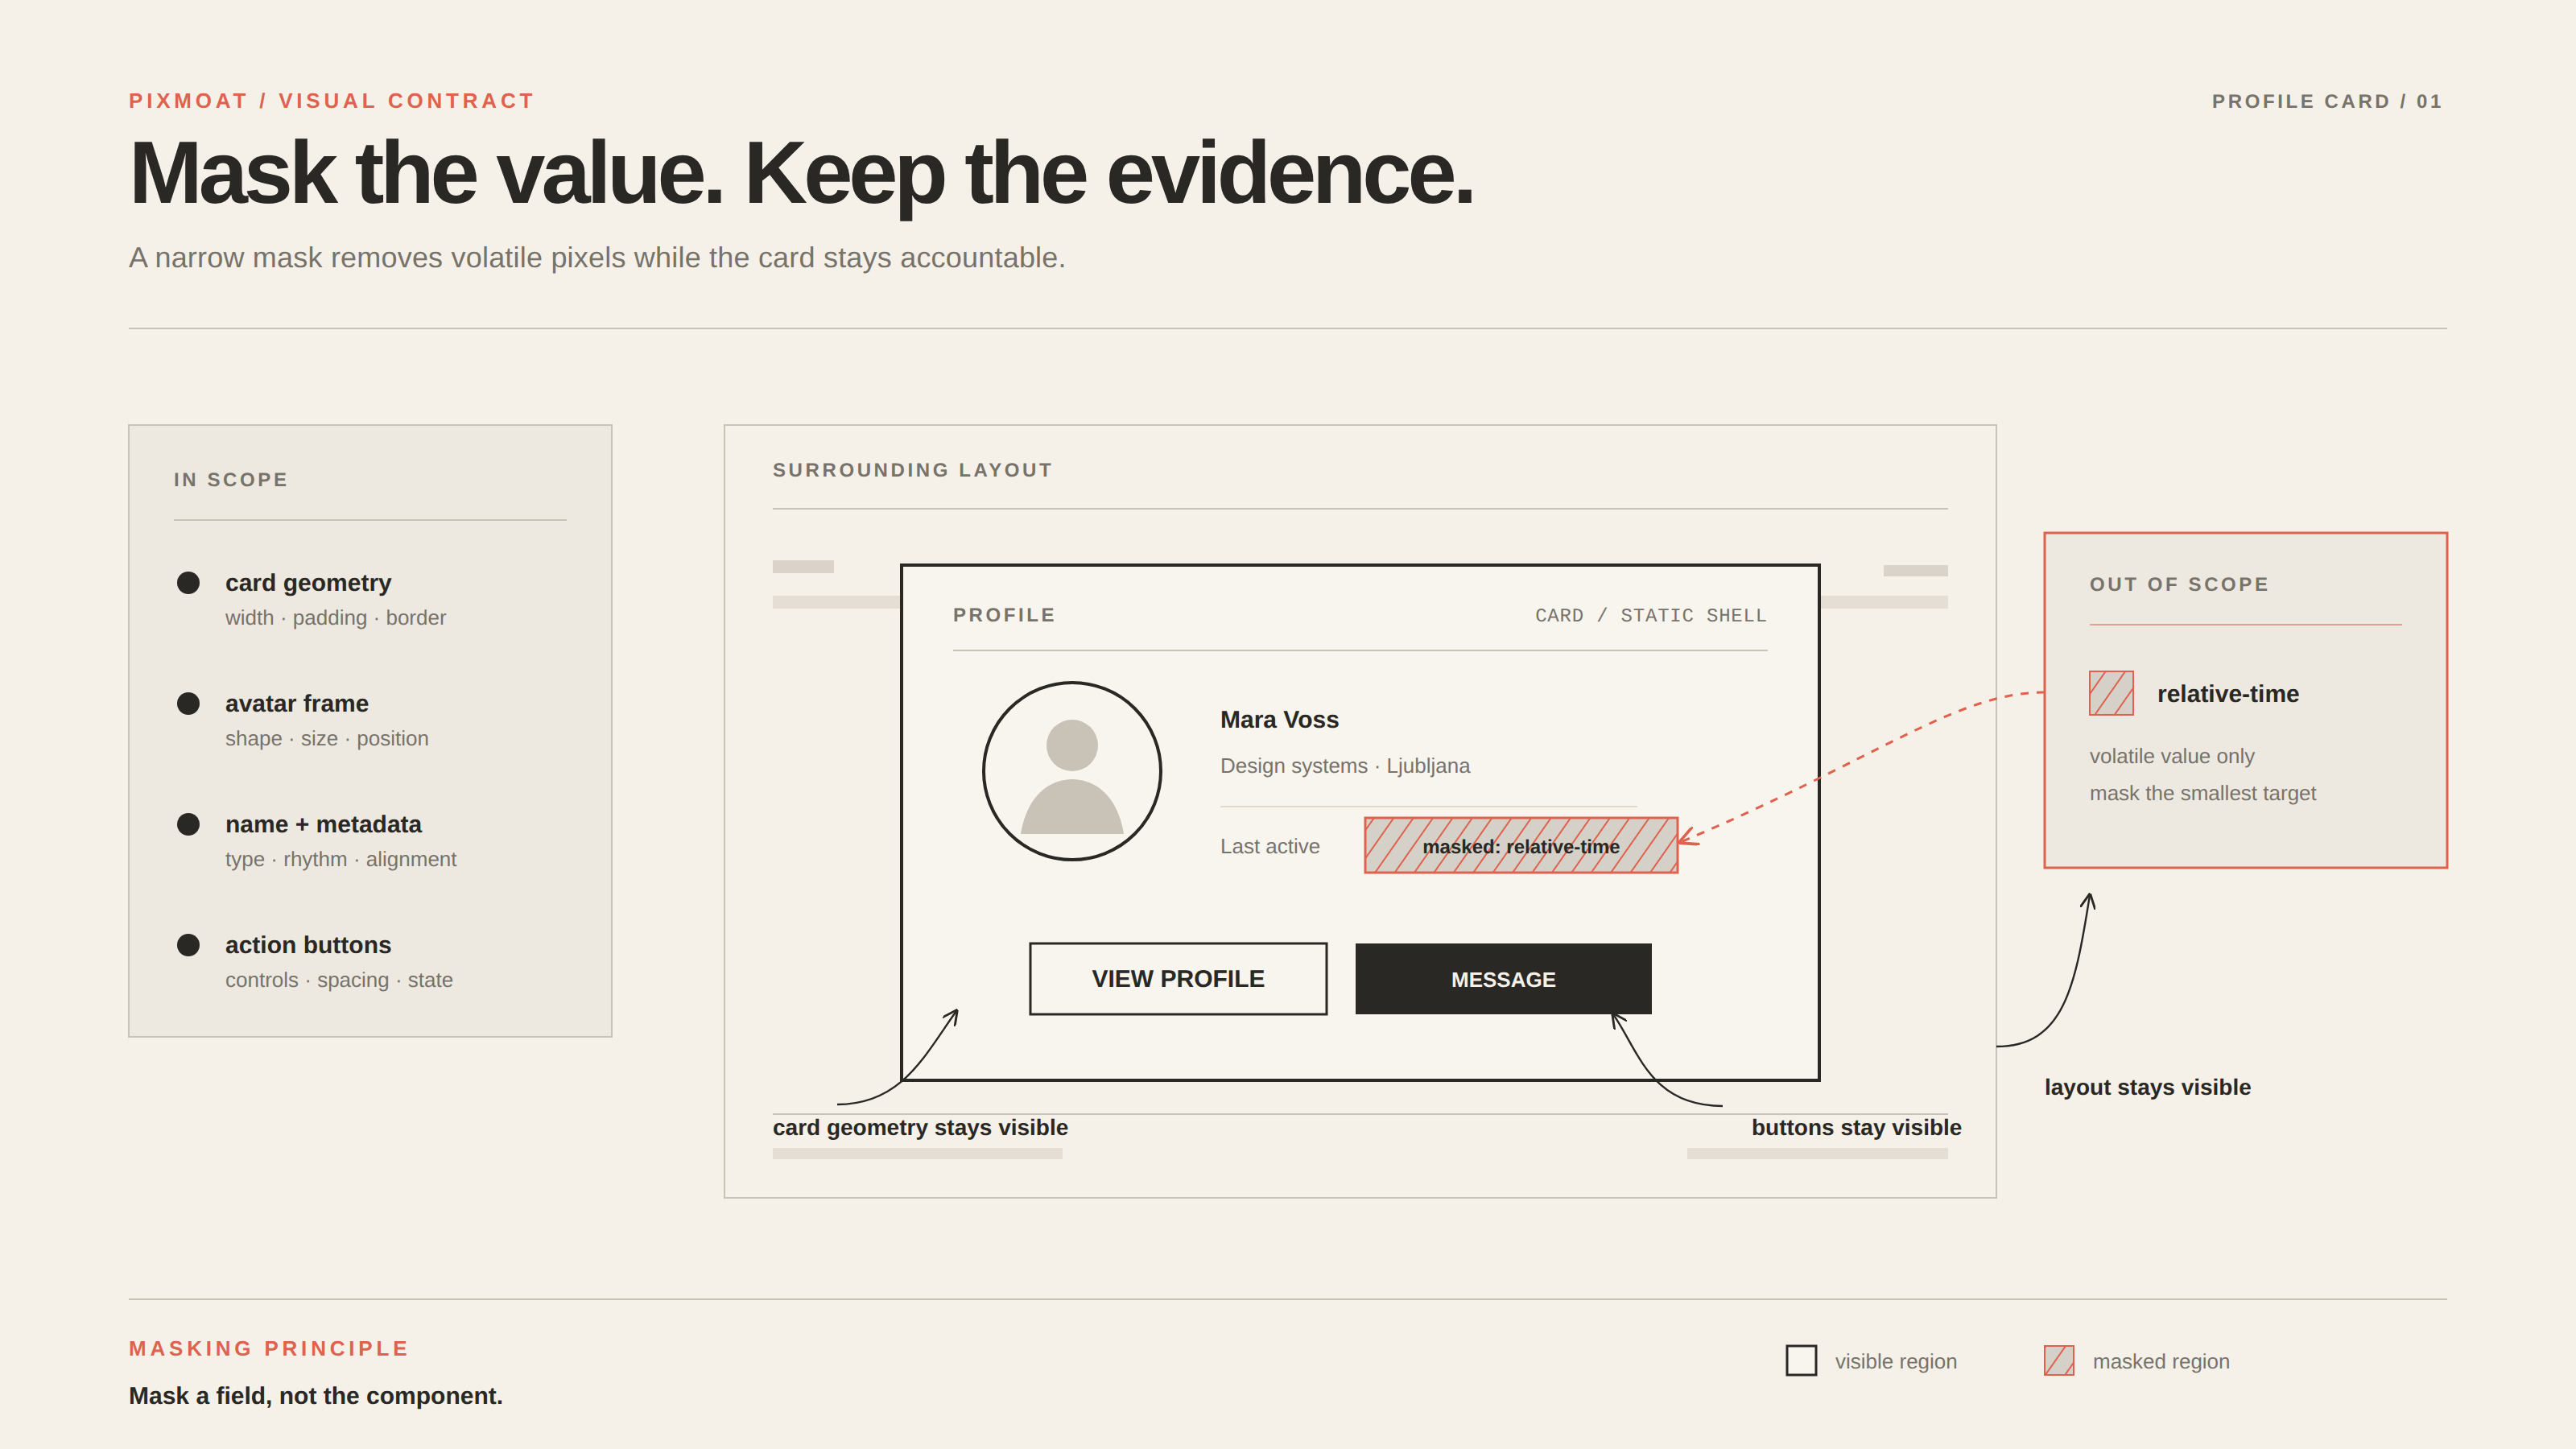
Assume /profile renders a card with a relative-time label. The markup gives that label a stable identifier: <span data-testid="relative-time">3 minutes ago</span>. The screenshot should check the card’s geometry and controls, but not the exact wording of the relative time.
With the documented Pixmoat fixture integration, install @s4labs/pixmoat-playwright, import test from that package, navigate to /profile, wait for the card, and capture it with mask: [page.getByTestId("relative-time")]. A complete capture call is: await pixmoat.snapshot(page, "profile", { viewport: "1280x720", browser: "chromium", mask: [page.getByTestId("relative-time")] });.
This mask is resolved from the element’s bounding box before upload. It does not hide the card’s border, padding, avatar frame, buttons, or surrounding layout. Change the button padding and the screenshot should still differ. Change only “3 minutes ago” to “4 minutes ago” and that text should not create a visual diff.
If the avatar image itself is intentionally random, decide what you need to preserve. If the avatar’s visual identity is part of the test, make the image deterministic. If only its size and place in the card matter, hide the image content while preserving layout. Pixmoat supports a data-pixmoat="hide" attribute for that case; the element becomes visually hidden before capture while its layout remains in place. Do not use display: none as a shortcut when removing the element would change the very layout you want to check.
Where Pixmoat fits
Pixmoat is a Playwright-first, Playwright-only-in-v1 capture and review workflow. Its fixture API supports locator and coordinate masks, and its reporter can upload PNG attachments from existing Playwright toHaveScreenshot() tests without test-code changes. The Playwright integration guide is the source of truth for those setup choices.
The client also performs documented capture stabilization before screenshots: it can freeze or finish animations, wait for fonts, wait for images to decode, and collect data-pixmoat="ignore" and data-pixmoat="hide" regions. Attribute-based ignore regions are merged with test-code masks, scaled for device pixel ratio, and shown with separate provenance in the review overlay. That helps a reviewer see that a region was ignored by markup rather than drawn later during review.
The comparison itself is deterministic pixel comparison. Pixmoat can generate highlighted diffs and expose changed-region metadata, but it does not decide whether your application data should be stable, whether a masked area contains a meaningful regression, or whether a consistent change is intentional. Those decisions still belong in the test design and human review process.
For fast iteration, the Playwright integration guide documents capture and comparison options. Local results are advisory; CI remains the authoritative run. When a difference remains, use the visual review guide to decide what to inspect before approving it.
Keep the signal, remove the noise
The goal of masking is not to make screenshot tests green. It is to make their failures legible. Stabilize data and rendering first, choose the smallest stable mask for content that is genuinely out of scope, and test the mask with an intentional change nearby.
When you are ready to apply this workflow to a Playwright suite, read the Playwright masking and screenshot guide. Start with one route and one carefully scoped dynamic region; expand only after the unchanged run is repeatable and the reviewer can still see the regressions that matter.